The Right Fit Every Time — Step-by-Step Pallet Rack Measuring Guide

Sizing Up Pallet Rack Components for a Perfect Fit
Understanding standard pallet rack dimensions and confirming that each component is correctly measured are essential steps in designing a new pallet rack system, adding on to an existing system or fixing broken components. Proper system functionality, safety, and structural capacity are at stake. The Apex Colorado team wants to ensure that you get the right fit every time, so we’ve compiled some tips on accurately measuring pallet rack components.
Getting Started – Configuring Basic Pallet Racking
At its most basic level, a pallet rack system is constructed with vertical uprights that connect with horizontally attached beams to create a shelf on which to store palletized inventory or other types of materials.
The uprights are formed by connecting two columns (one in the front and one in the rear) with vertical and horizontal struts. The uprights are anchored to the floor with anchor bolts through baseplates at the base of each column. Interesting tidbit – front and rear columns on an upright can be different, so it is imperative to measure both columns.
A sample pallet rack design looks like this:

Pallet dimensions and load weights are the foundation of the pallet rack system design. A typical pallet rack system is designed for two pallets stored side-by-side in each bay. Each bay should have 6″ of open space between the pallets, plus 5″ on either side and 4″ to 6″ above the pallets for liftoff clearance. In seismic areas, designs will vary. For example, a pallet rack system may need larger baseplates, so it is imperative to speak with an engineer to ensure your system adheres to all safety requirements.
Most pallet bays are 42″ or 48″ deep, which can accommodate commonly used pallet sizes. A 42″ pallet rack system allows for pallet overhang in the front and rear of a rack, while a 48″ design fits a full pallet without any overhang. Check out our blog for a deeper dive into the pros and cons of 42″ vs. 48″ wide pallet rack bay.
Comparing Structural and Roll-Formed Pallet Rack Systems
When it comes to component manufacturing, there are two types of steel products: structural and roll-formed. Structural steel is significantly heavier and therefore is more costly to ship and install. Roll-formed is lighter weight, and the beams connect a little easier than structural beams. Most systems use one or the other type for the uprights and beams; however, hybrid systems, which have a lower initial cost, are sometimes used. A hybrid system is often built with structural uprights and roll-formed beams. Each design is structurally sound, with the proper engineering. Check out our blog post to learn about structural vs. roll-formed pallet rack.

Measuring Pallet Rack Components – Item by Item
Measure each component of your pallet rack system as outlined below.
- Upright Frames
- Custom Frames
- Struts
- Beams
- Beam Connections
- Decking
How to Measure an Upright Frame
To gather all the data on your upright properly, you will take six measurements.
- Upright frame depth – Measure from the outside of the first column to the outside of the opposite column. Typically the depth is 36″ to 48″, but it can vary for custom systems. (A)
- Column width – Measure the width of the face of the column and then measure the side. Both measurements may be the same or differ – the larger the column, the higher the rated capacity. (B)
- Column height – Starting at the base of the column where it attaches to the baseplate, measure up to the top.
- Front column depth – Measure from the front to the back of the column. (C)
- Back column depth – Measure from the front to the back of the column. (D)
- Baseplate size – Measure the length and width of the baseplate. (L,M)
- Measure the distance from the edge of the baseplate to the column, front, and side. (N,O)

Custom Frame Measurement Guide
Seismic Backer – Reinforced Column
In some cases, columns are reinforced with an additional steel component called a backer. These add strength and stability to the column. Backers are placed behind the front column and usually only extend above the first pallet position. They can increase load capacity and protect a system from failure due to earthquake damage or equipment strikes.
Use two measurements to determine the size of your backer.
- Measure from the floor to the top of the reinforcement to get the height for both the front and rear columns. (J,K)
- Measure the depth, starting from where it is welded to the column for both the front and rear columns. (C,D)

Offset & Sloped- Leg Frame Measurement
If your front column is angled or sloped front to back, it is to allow more room for the forklift turning radius. Click here to learn more about offset and slope leg frames. Follow these steps to measure a sloped or angled front column.
- Measure the height of the frame at the start of the slope.
- Measure the frame depth at the base of the upright.
- Measure the frame depth at the top of the sloped section, just below the first rack bay.
- Note if the frame is offset, sloped, or cant leg.

Beam Measurements
Spacing
The following beam spacing dimensions are necessary when replacing or retrofitting pallet rack columns.
- Measure the largest opening between the beams.
- Measure from the floor to the bottom of the beam connector (P)
- Measure from the floor to the top of the beam. (Q)

Struts
Struts are diagonal or horizontal steel components that brace the columns to create the uprights. First, identify the shape of the strut –are they square or round tubes?
To measure horizontal struts:
- Start at the floor and measure up to the underside of the strut. (E)
- Measure from the floor to where the column and first diagonal strut connect. (F)

Beam Dimensions
For a proper beam assessment, you will take three measurements.
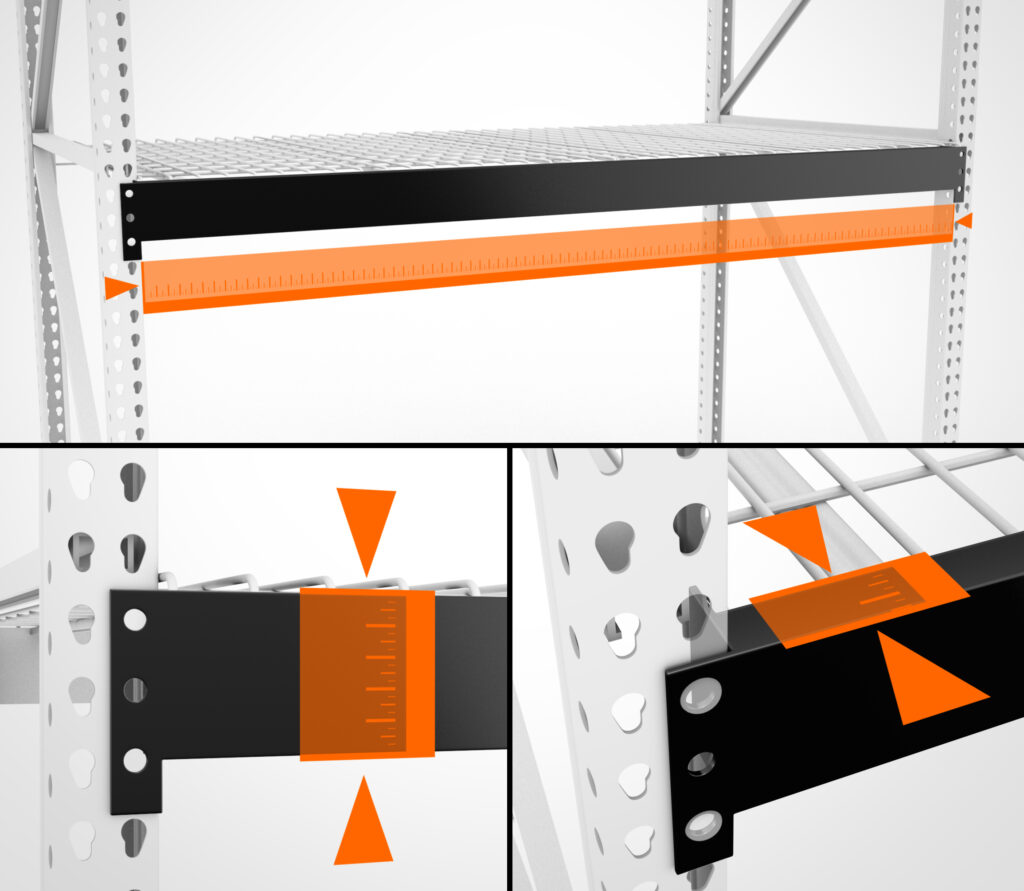
- Beam Length – Crossbeams have connectors at each end that attach the beam to the upright. When taking a beam measurement, do not include the connector. The beam measurement starts at the inside of the upright and measures to the inside of the opposite upright. The most common beam length is between 4′ and 9′. (top image)
- Beam face (thickness) – Measure from the top of the beam to the bottom to find the face size. This measurement is critical in determining load capacity. The larger the face, the larger the permissible capacity. (bottom left)
- Beam depth – From the top of the beam, measure from the front to the back to determine the width. (bottom right)
Beam Connector Plates
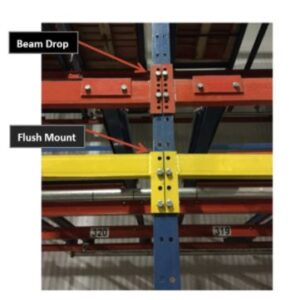
Beam connector plates can vary widely by system type and pallet rack manufacturer. Most are welded flush with the top of the beam; however, the beam can be positioned in the middle or at the bottom of the plate creating a beam drop. Beam drops create a pitch from the rear to the front of the pallet rack system to accommodate flow rails for pallet flow or push-back rack. Beam drops are also used to create pick locations.
 Larger connector plates will provide more system stability from left to right. Typically, beams are centered on larger plates. Several measurements will enable you to duplicate a proper beam to upright attachment.
- Identify beam connector – Structural rack has round holes for bolted connections, whereas roll-formed pallet rack can have various connection types from clips to bolts to pins. Step beams can have 2, 3, or 4-pin or a tab-end connector.
- Capture the number of pins – How many holes does the connector have?
- Connector height – Measure the connector from top to bottom.
- Connector width – Measure the connector’s width across the upright face.
- Connector depth – Measure the connector width along the side of the upright.

Addressing Beam Punches
In some instances, your beam may have punches over and above the beam connections. Indicate the total number of punches and complete the following measurements.
- Measure from the edge of the beam to the center of the first hole.
- Measure the top of the beam to the center of the first hole.
- Repeat for all holes.

Don’t Forget Your Pallet Rack Decking Measurements

There are several materials used to provide a surface within your pallet rack bays. Wire decking is common because of its multi-functional use and design that lets light and water pass through the levels. However, there are different wire decking styles, so be sure to identify the type of decking to ensure you capture all the necessary measurements.
Wire Decking Styles
- Flared channel
- Step deck:
- Waterfall design – wraps around the outside of the front crossbeam.
- Inside waterfall or flush deck – mounts to the step beam.
Measure the upright depth and beam length, plus:
- Width – Look down at the top of the beam and measure the width.
- Depth – If the step beam is mounted, measure the depth of your beam step.

Obtaining the Perfect Fit
Careful measurements will set you on your way to creating a just-right new storage solution or repairing your existing system. If you’re expanding your rack system or adding new, look no further than Apex Quick Ship inventory. We offer new and used frames, beams, and accessories like wire decking and rack guards. As your local source for pallet rack components, we offer favorable shipping costs and short time frames.
Colorado customers, we’ve got your pallet racking needs covered. We design all types of pallet rack systems and offer professional installation, rack maintenance, and repairs. Call us today to discuss your inventory storage and processing challenges.
