Get The Right Pallet Rack Measurements Every Time!

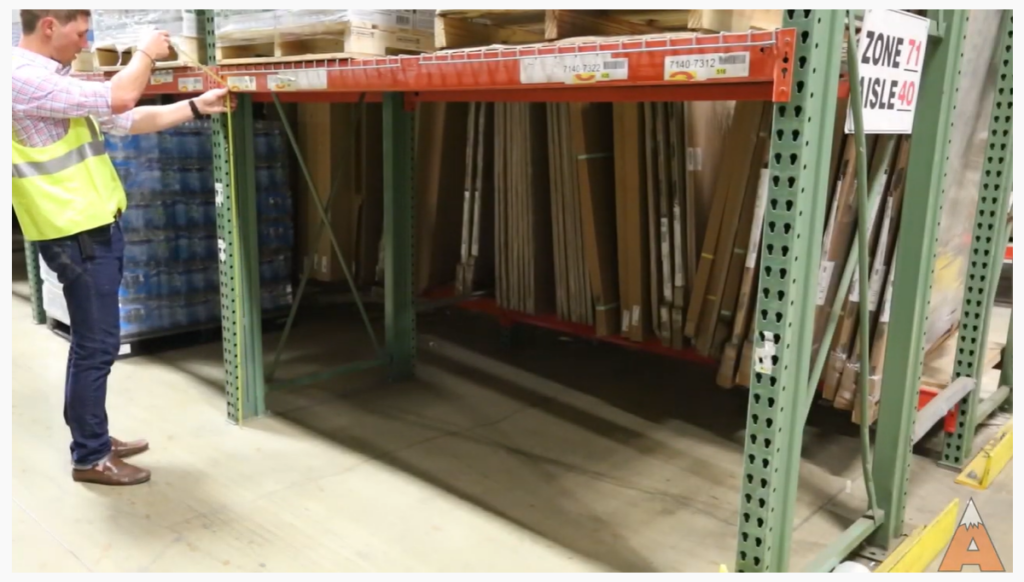
Whether embarking on a new installation, addressing damaged elements, or expanding an already existing pallet rack setup, it is crucial to measure each component accurately. The integrity of the system, its operational efficiency, and overall safety hinge upon this step. Presented below are some guidelines to assist in the accurate configuration and measurement of pallet rack components, ensuring an optimal fit on every occasion.
BEGINNING THE JOURNEY – SETTING UP YOUR PALLET RACK SYSTEM
Comprised of a sequence of upright frames and shelf beams, a pallet rack system accommodates multiple pallet loads. The uprights are formed by connecting two columns through a network of horizontal and vertical struts. Baseplates at the foot of each column anchor the uprights to the floor. Note that front and rear column heights and designs may vary, so measuring both columns is always recommended.
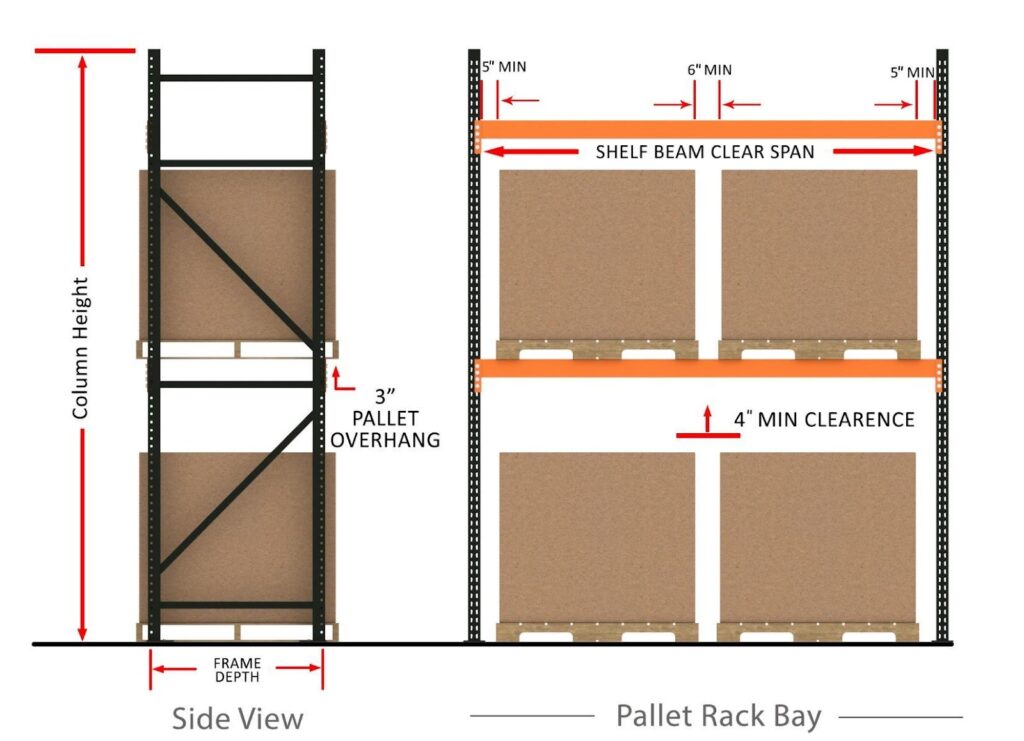
The system’s design is rooted in the dimensions of both the pallet and the load. A typical pallet rack system is structured to accommodate two pallets positioned side by side within each storage bay. Specific spacing guidelines include a 6″ gap between pallets, with 5″ on either side and a 4″ to 6″ clearance above the pallets for liftoff. In seismic regions, variations in design may be necessary. For instance, the system may demand larger baseplates. Therefore, consulting with an engineer is crucial to guarantee that your system meets all safety requirements.
Standard bay depth is 42″ or 48″ to accommodate GMA-style (commonly used) pallets, which are 40” x 48”. A 42″ depth permits 3” of overhang at the front and back of the rack, whereas a 48″ deep design fits the entire pallet without overhang.
Our blog explores the advantages and disadvantages of a 42″ versus 48″ wide pallet rack bay in more detail.
STRUCTURAL VS. ROLL-FORMED PALLET RACK
Pallet rack components are crafted using either roll-formed or structural steel manufacturing. While both offer reliable pallet racking solutions, there are significant differences in upright-to-beam connections, component weight (affecting shipping costs), and durability in accidental forklift strikes. Both types of racking offer pluses and considerations that may affect which is best for your application –take a look at our blog comparison to help identify the best rack for your application.

MEASURING PALLET RACK COMPONENTS
When collecting measurements for your pallet rack system, concentrate on the primary components, following the guidelines illustrated below:
- Upright Frames
- Custom Frames
- Struts
- Beams
- Beam Connections
- Decking
UPRIGHT FRAME MEASUREMENT
To establish the dimensions of the upright frame, you’ll need the following six measurements:
Upright Frame Depth (A):
- Measure from the first column’s outer edge to the opposite column’s outer edge. While the depth typically ranges from 36″ to 48″, custom systems may exhibit variations.
Column Width (B):
- Assess the width of the column face.
- Evaluate the side of the column.
Note: The measurements may coincide or differ; a larger column generally indicates a higher-rated capacity.
Column Height:
- Commencing from the base, where it connects to the baseplate, measure upward to the top of the column.
Front Column Depth (C):
- Gauge the measurement from the front to the back of the column.
Back Column Depth (D):
- Determine the measurement from the front to the back of the column.
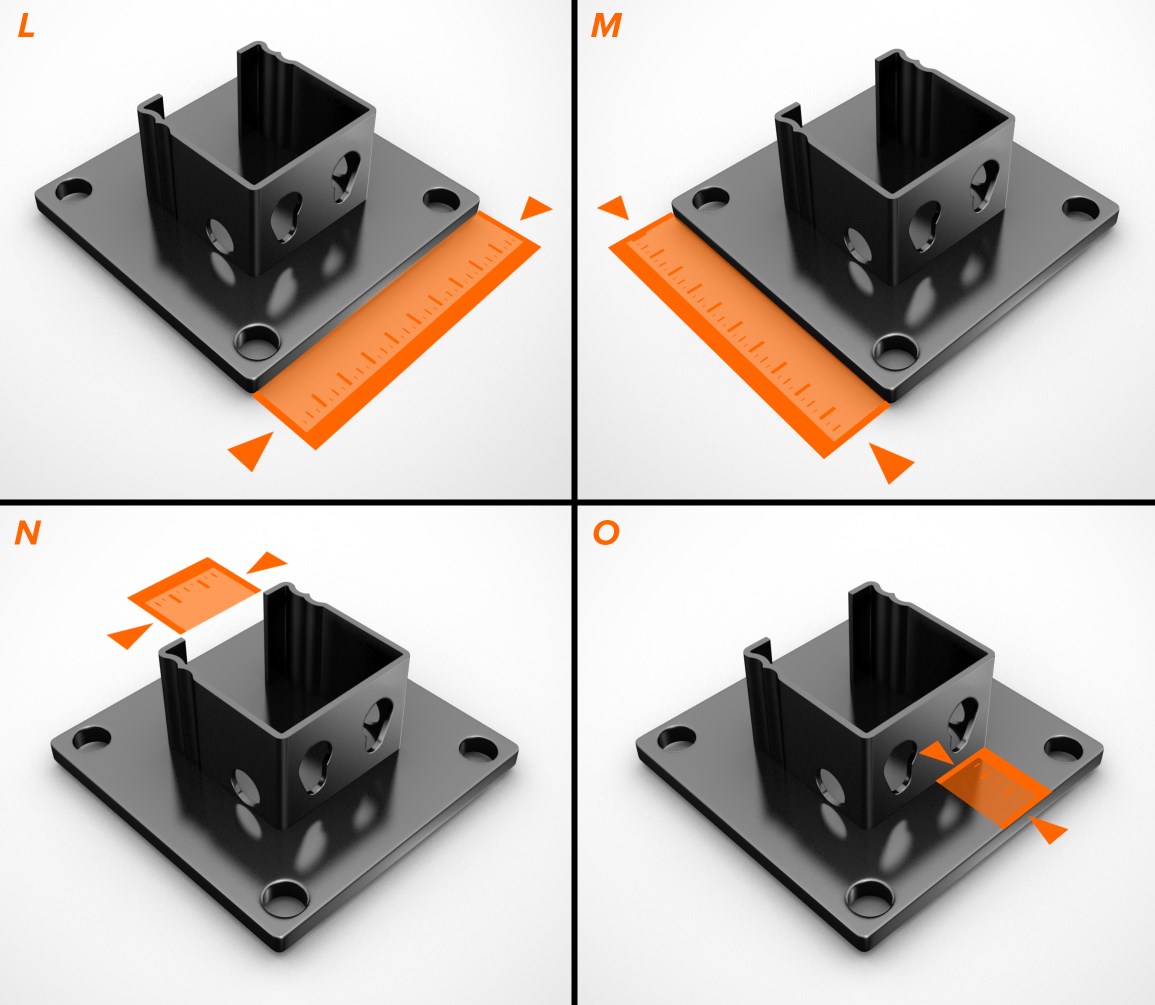
Baseplate Size (L, M):
- Measure both the length and width of the baseplate.
- Specify the distance from the baseplate edge to the column on the front (N) and side (O).

Custom Frame Measurement
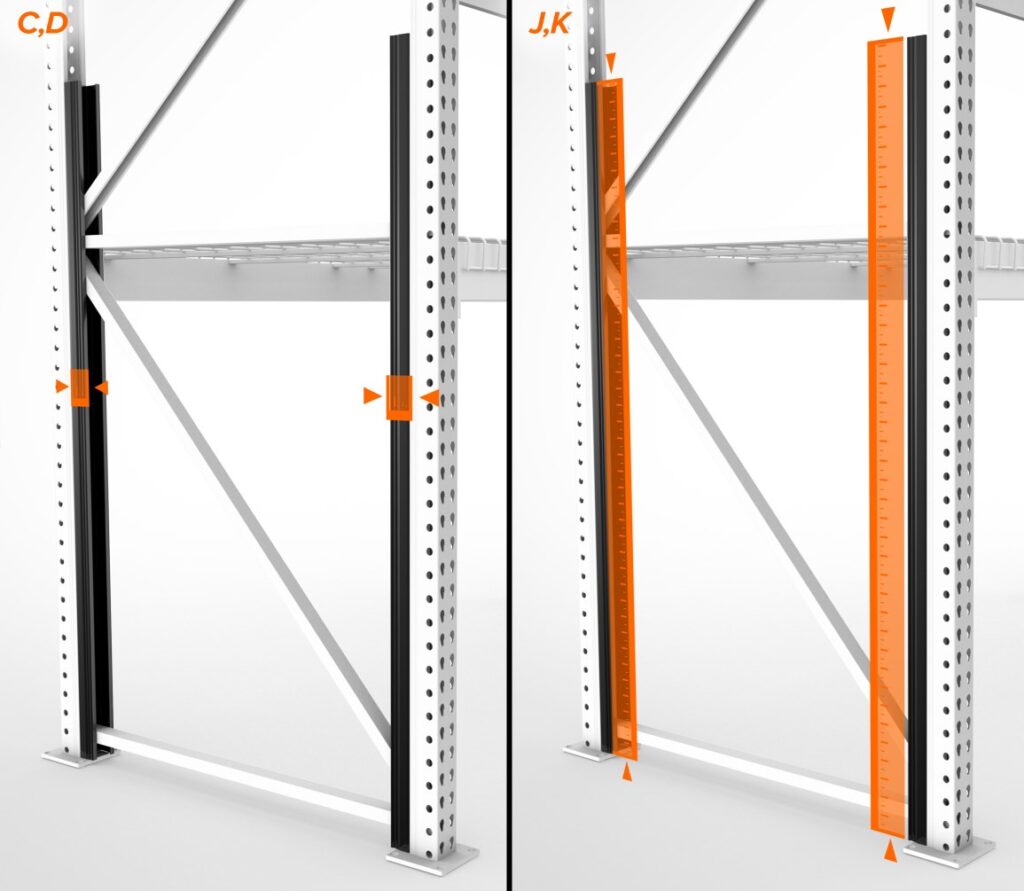
Seismic Backer – Strengthening Your Columns
In certain instances, incorporating reinforced columns enhances the system’s overall stability. Backers are positioned behind the front column and generally extend only above the initial pallet position. This strategic placement can augment load capacity and safeguard against potential system failure from equipment impacts or seismic events.
To determine the size of your backer, perform two essential measurements:
1.Height Measurement (J, K):
- Measure from the floor to the top of the reinforcement for both the front and rear columns.
2. Depth Measurement (C, D):
- Measure the depth starting from the point where it is welded to the column for both the front and rear columns
Offset & Sloped Leg Frame Measurement
When your pallet rack column is angled or sloped to accommodate a wider forklift turning radius, specific measurements distinct from those for a standard column are required. For further insights on offset and slope leg frames, click here.
1.Height Measurement:
- Measure the height of the frame at the initiation of the slope.
2. Base Depth Measurement:
- Measure the depth of the frame at the base of the upright.
3. Top Sloped Section Depth Measurement:
- Measure the frame depth at the top of the sloped section, just below the first rack bay.
Make sure to note whether the frame is offset, sloped, or has a cant leg.
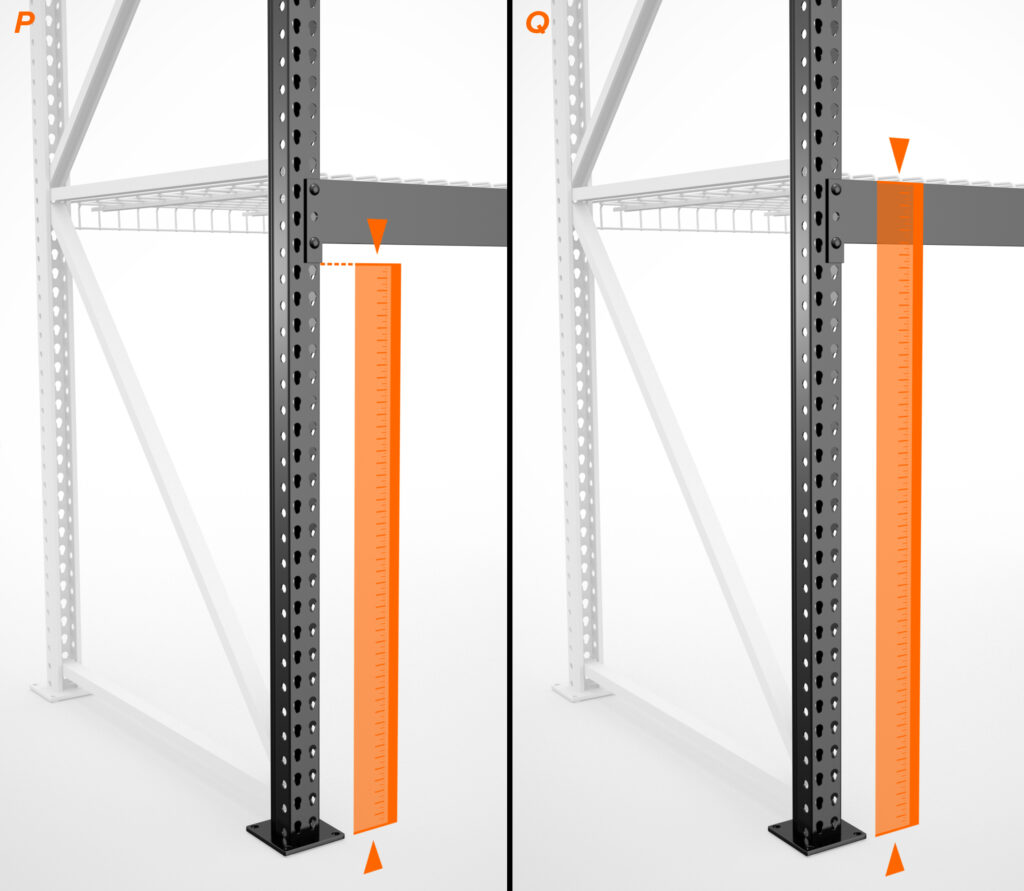
Beam Spacing
Critical Beam Spacing Measurements for Pallet Rack Column Retrofitting or Replacement:
1.Maximum Opening Measurement:
- Determine the largest opening between the beams.
2.Beam Connector Height Measurement (P):
- Measure from the floor to the bottom of the beam connector.
3.Beam Height Measurement (Q):
- Measure from the floor to the top of the beam.
These measurements are essential when retrofitting or replacing pallet rack columns.
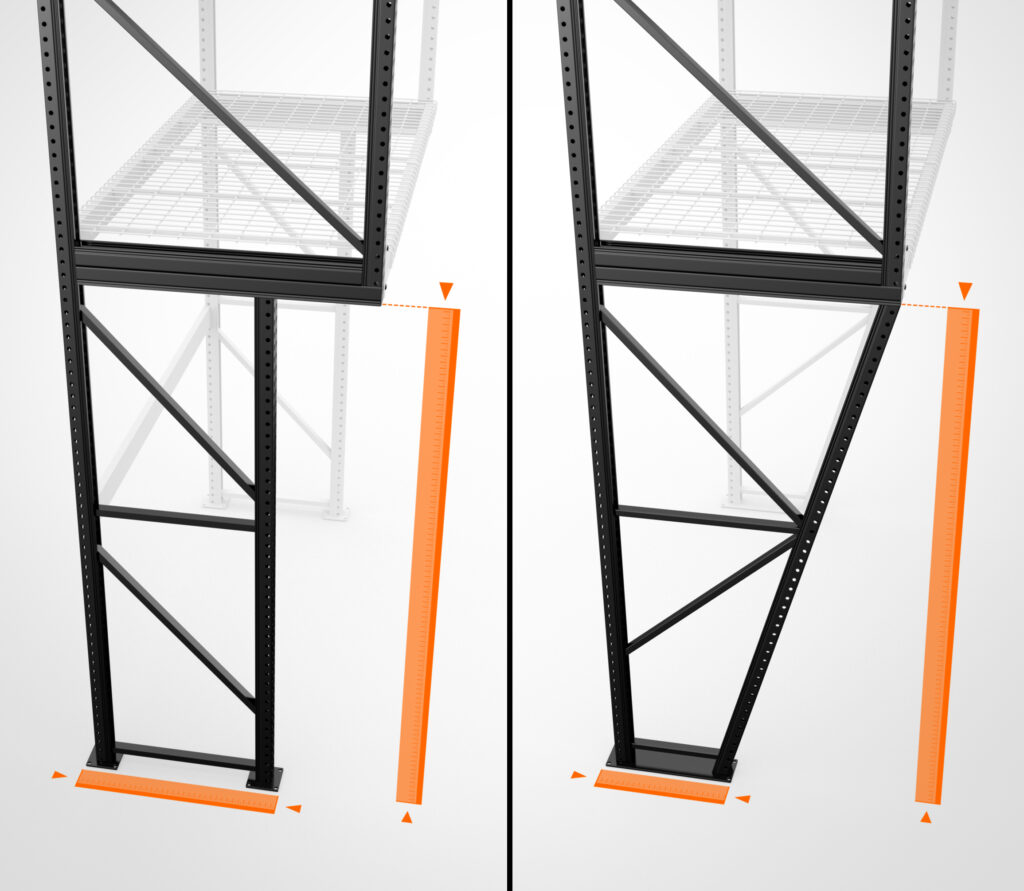
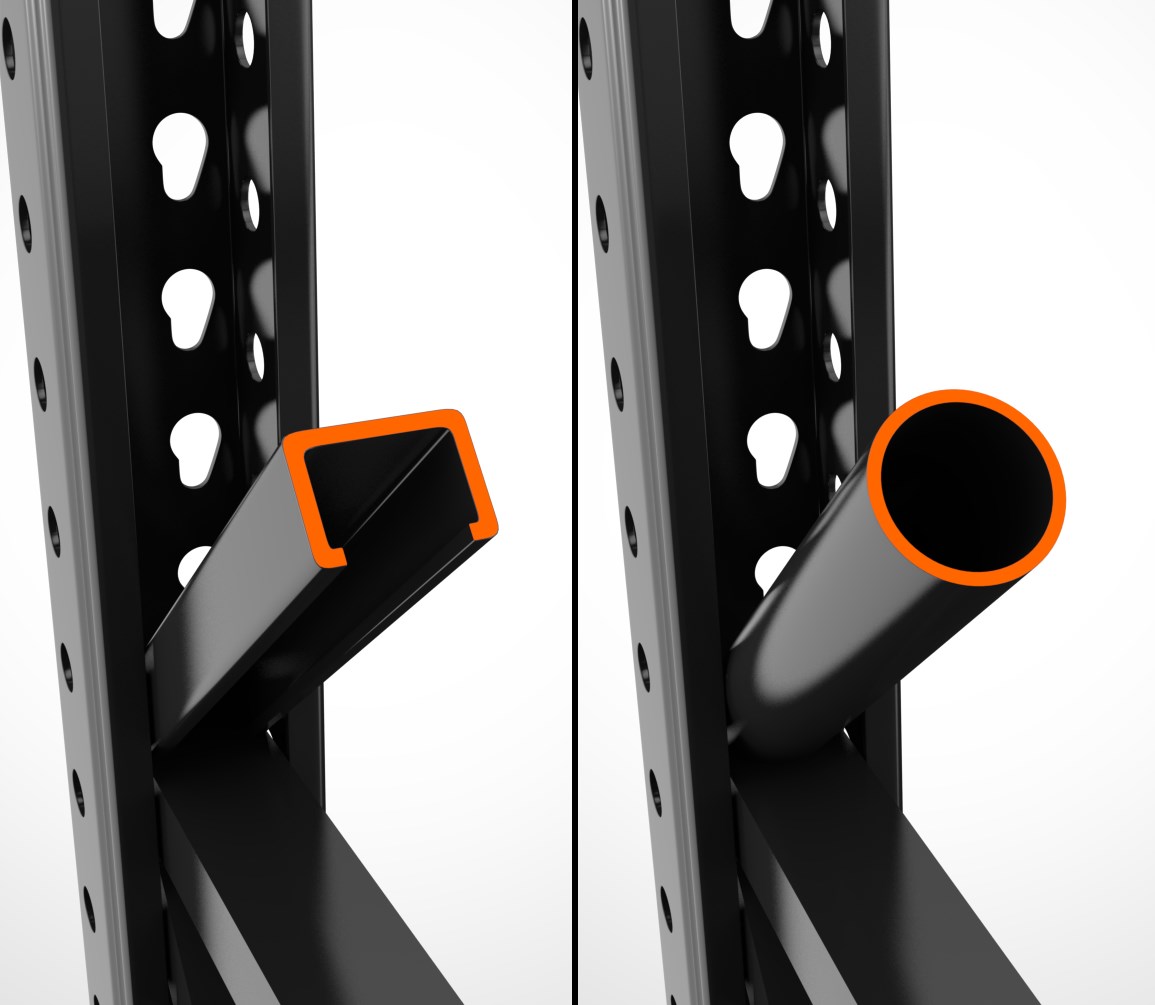
STRUTS & STRUT MEASUREMENT
Struts, essential for bracing between columns to shape the upright, come in horizontal or diagonal steel components with variations in shape, such as square or round tubes. When measuring horizontal struts for replacement or add-on uprights, follow these steps:
1.Strut Shape Identification:
- Begin by determining if the strut is a square or round tube shape.
2.Height Measurement to Underside of Strut (E):
- Start from the floor and measure up to the underside of the strut.
3.Height Measurement to Connection Point of Column and First Diagonal Strut (F):
- Measure from the floor to where the column and the first diagonal strut connect.

Pallet Rack Beam Measurement
- To conduct a comprehensive assessment of a beam, follow these three key measurements:
- Beam Length Measurement:
- Exclude connectors at the ends that attach the beam to the upright.
- Commence the measurement from the inside of one upright to the inside of the opposite upright.
- Common beam lengths range from 48” to 108″.
- Beam Length Measurement:
- Beam Face (Thickness) Measurement:
- Measure from the top of the beam to the bottom to determine the face size.
- This measurement is crucial for determining load capacity, with a larger face allowing for a larger allowable capacity.
- Beam Depth Measurement:
- Measure from the top of the beam to determine the width from the front to the back.

These measurements provide vital information for a thorough beam assessment.
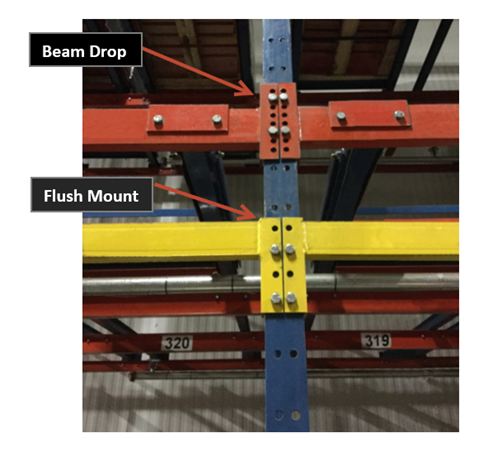
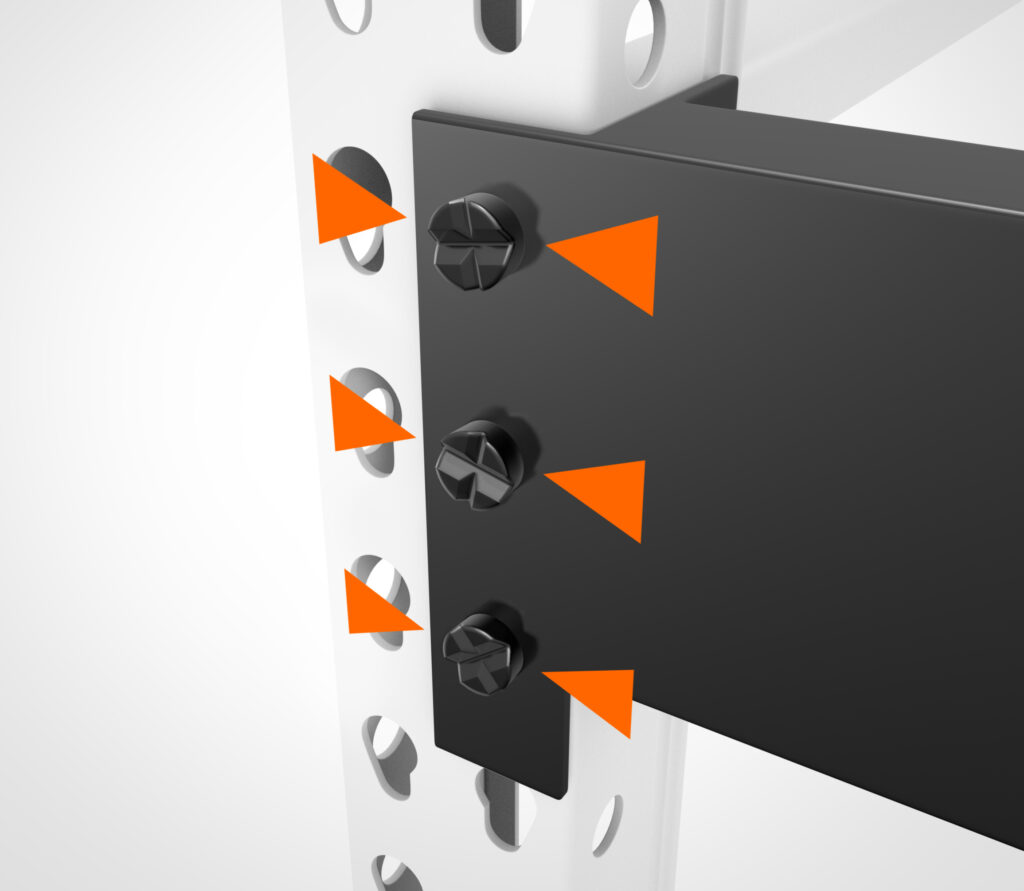
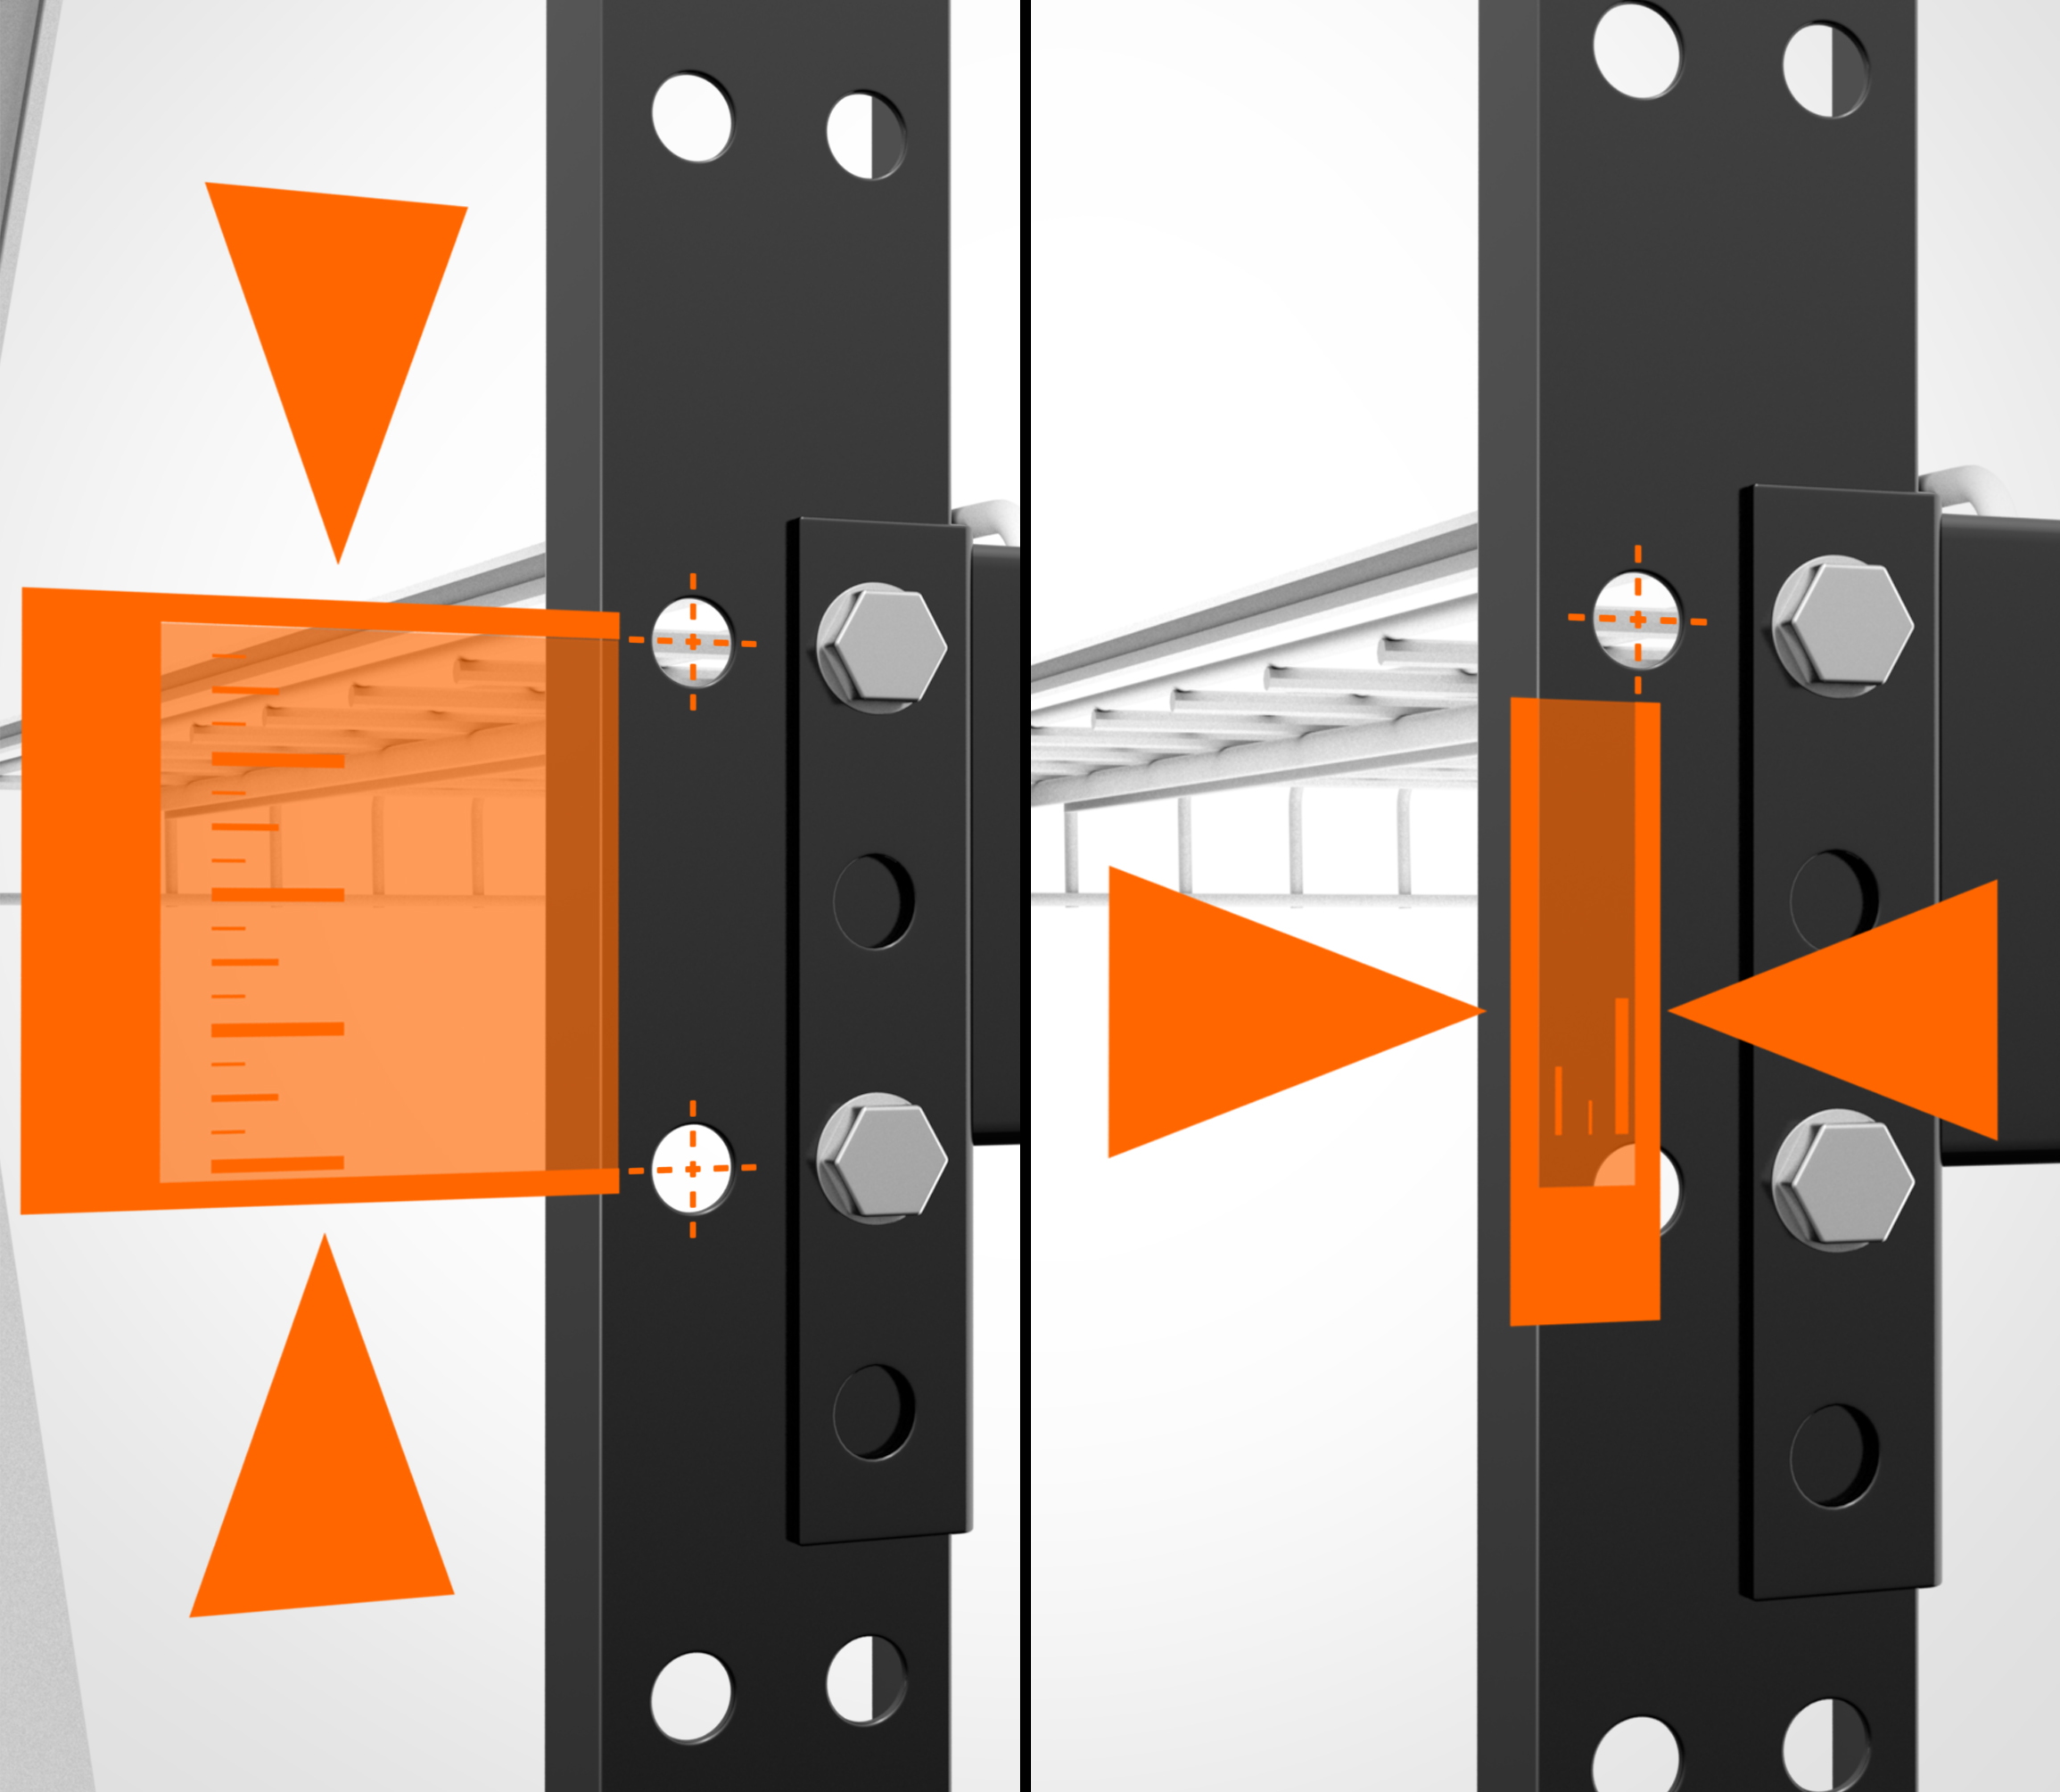
Beam Connector Plates
The design of beam connector plates can significantly differ based on the system type and pallet rack manufacturer. While many are typically welded flush with the top of the beam, variations exist, such as positioning the beam in the middle or at the bottom of the plate to create a beam drop. Beam drops introduce a pitch from the rear to the front of the rack system, accommodating features like flow rails for pallet flow or push-back rack, and are also instrumental in establishing pick locations.
To accurately replicate a proper beam-to-upright attachment, consider the following measurements:
- Identify Beam Connector:
- For structural racks, round holes are prevalent for bolted connections.
- Roll-formed racks may feature various connection types, ranging from clips to bolts to pins.
- Step beams might incorporate 2-, 3-, or 4-pin connectors or a tab-end connector.
- Capture Number of Pins:
- Determine the number of holes present in the connector.
- Connector Height Measurement:
- Measure the connector from top to bottom.
- Connector Width Measurement:
- Measure the width of the connector across the face of the upright.
- Connector Depth Measurement:
- Measure the width of the connector along the side of the upright.
- Upright Punches:
- Measure the distance between the holes on the upright, using the center of the holes as both the start and endpoint.
These measurements are essential for ensuring an accurate duplication of the beam-to-upright attachment.
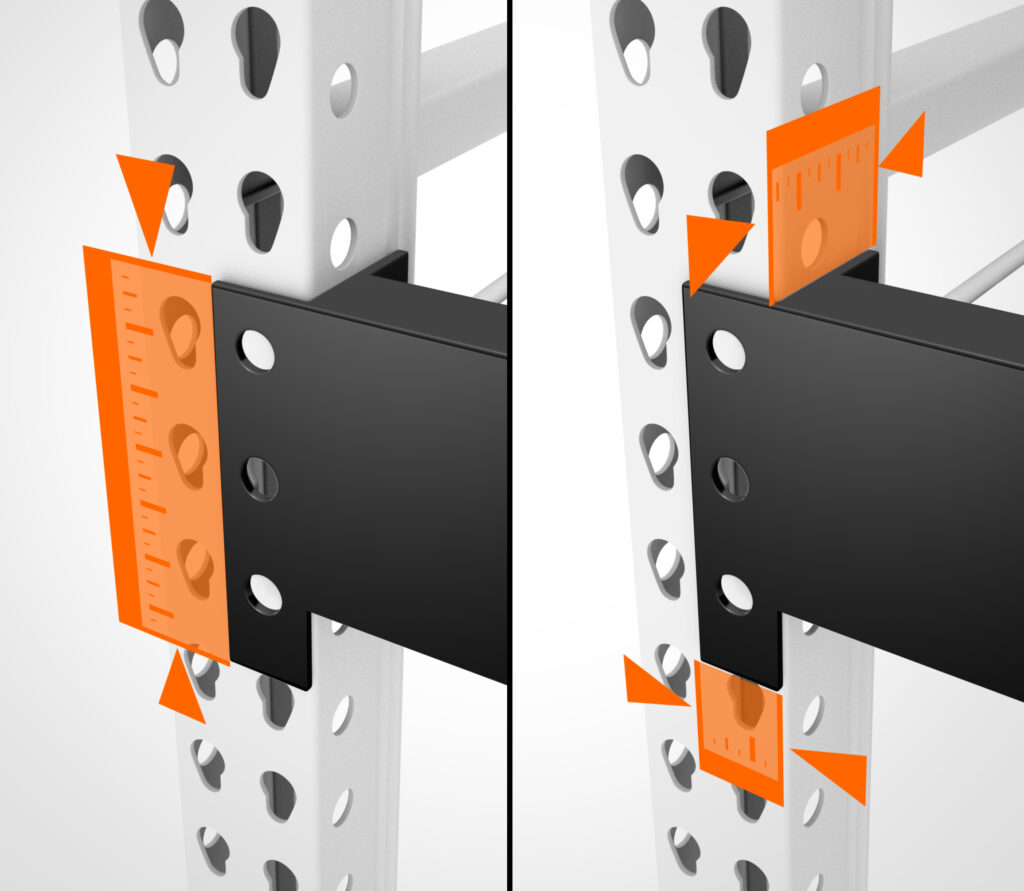
Beam Punches
Beams are sometimes punched to accommodate rails for pallet flow racking. To properly measure punched beams, follow these steps and measurements:
- Total Number of Punches:
- Indicate the total number of punches on the beam.
- Measurements for Each Hole:
- Measure from the edge of the beam to the center of the first hole.
- Measure from the top of the beam to the center of the first hole.
- Repeat these measurements for all holes present.
These measurements provide crucial details about the placement and dimensions of punches on the beam to enable secure connections.

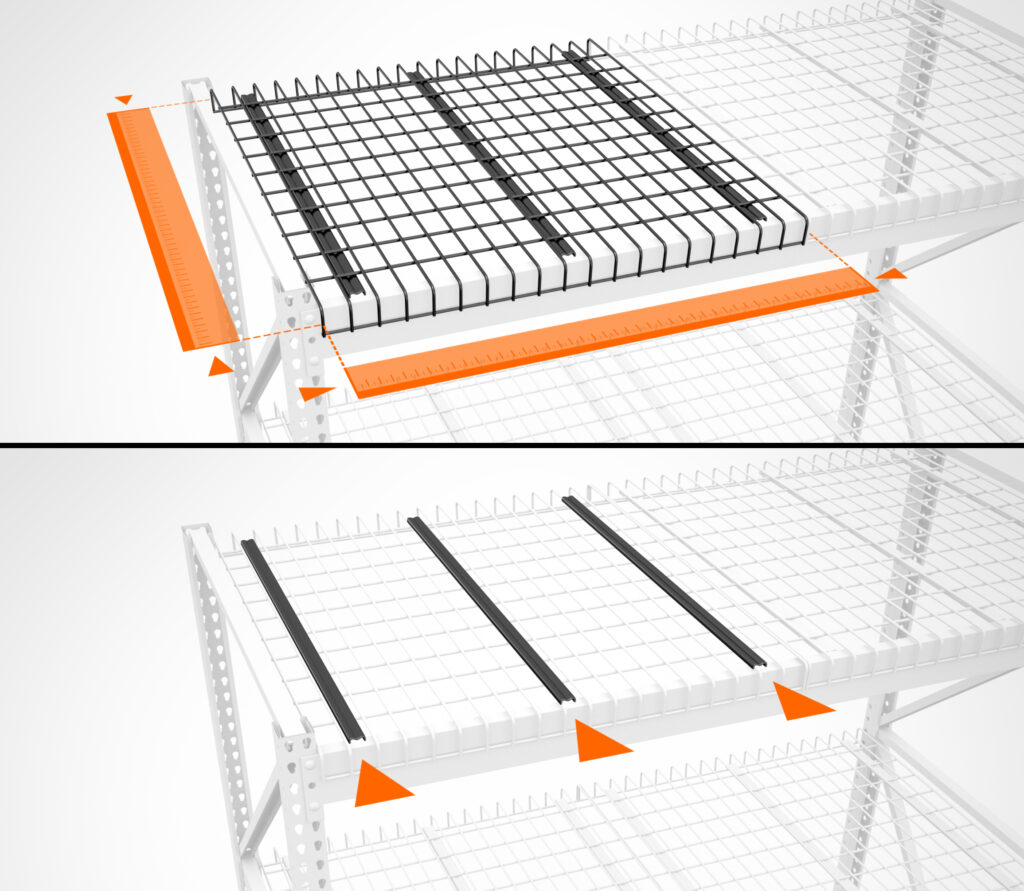
Measuring Pallet Rack Decking
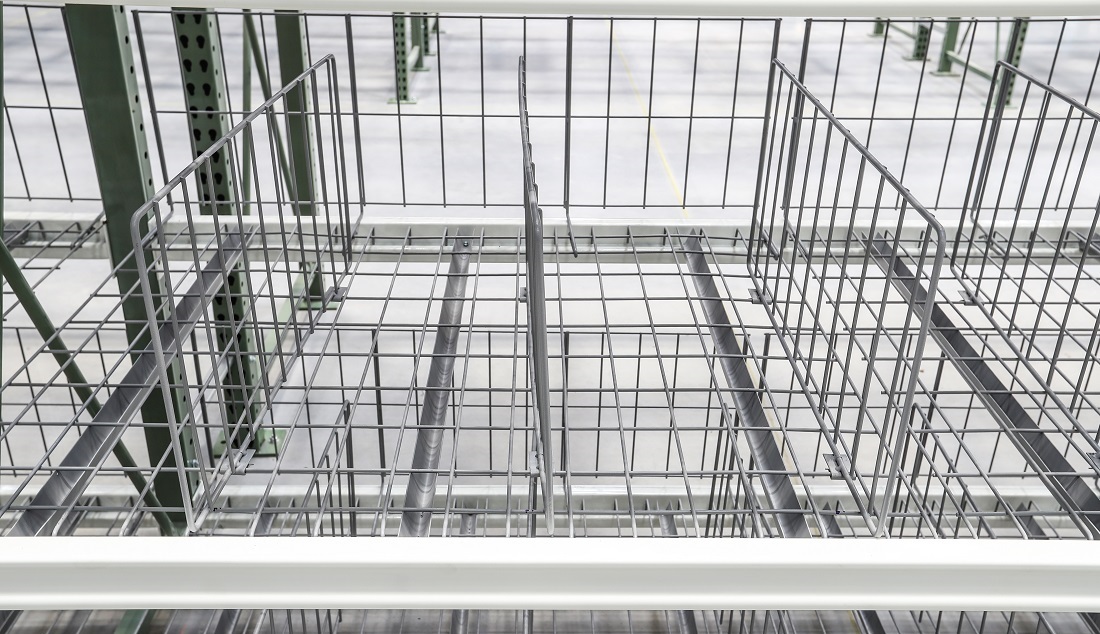
Inside Waterfall Wire Decking
Various materials serve as pallet rack decking, with wire decking being the most prevalent. However, the multitude of options poses a challenge when seeking precise measurements. Wire decking primarily comes in two styles: flared channel deck and step deck, with additional variations within the step deck category. Therefore, it’s essential to identify the specific type of wire decking before determining the size.
For instance:
- In a waterfall design, the decking wraps around the outside of the front crossbeam, making the beam depth a critical measurement.
- An inside waterfall or flush deck style mounts to the inside of a step beam, requiring specific measurements.
To obtain accurate measurements for wire decking installation, along with your upright depth and beam length, consider the following:
- Top View Width Measurement:
- Looking down at the top of the beam, measure the width.
- Step Beam Depth (if applicable):
- If the step beam is mounted, measure the depth of your beam step.
These measurements, coupled with the type of wire decking, ensure a proper fit and installation.
Waterfall Wire Deck
Always the Right Fit
Armed with the comprehensive measurements outlined above, you are well on your way to designing and installing your new storage racking system. If fast delivery of pallet rack components is a priority, look only as far as the Apex Quick Ship inventory. We provide new and used crossbeams, frames, and accessories, including wire decking.
The Apex team stands ready to assist you in making informed choices for your North or South Carolina Warehouse and can support you with a range of full-service offerings. Whether you require assistance with design, engineering, installation, equipment, rack assessment, repair, or more –Reach out to our team today for top-notch products, expert advice, and prompt service.
